1. CSDL trong ví dụ minh họa
Trong phần này, ta thiết kế một CSDL QL_DiemSV rất đơn giản nhằm mục đích minh họa cho các kỹ năng lập trình CSDL, gồm 4 quan hệ sau:
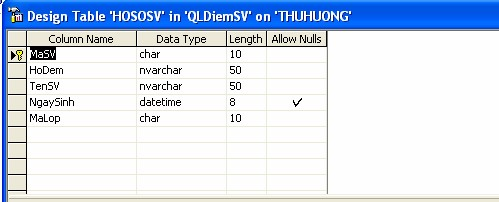
- Bảng Hồ sơ sinh viên (HOSOSV)
- Bảng danh mục Lớp (LOP)

- Bảng danh mục môn học (MONHOC)

- Bảng điểm (DIEM)


2. Xây dựng Form

Ta thực hiện xây dựng from trên thông qua các đối tượng sau.
- Tạo một Project Windows Application tên là QL_DiemSV.
- Tạo Form Nhập hồ sơ sinh viên (frmNhapHSSV) như hình có các đối tượng sau:

Sau khi thiết kế các đối tượng trên ta được một form như hình,
- Import các tên miền cần thiết. Mở code editor và chèn đoạn code sau.
Import Data and SqlClient namespaces... Imports System.Data
Imports System.Data.SqlClient- Tiếp theo khai báo các đối tượng global trong phạm vi của form này.
Import Data and SqlClient namespaces... Imports System.Data

Imports System.Data.SqlClient


Public Class frmNhapHSSV #Region "Khai bao cac ket noi"

Dim objConnection As New SqlConnection _ ("server=THUHUONG;database=QLDiemSV;user id=sa;password=pass2008")

Dim objDataAdapter As New SqlDataAdapter( _

"SELECT MaSV, HoDem, TenSV, NgaySinh, MaLop " & _ "FROM HOSOSV ", objConnection)

Dim objDataSet As DataSet Dim objDataView As DataView

Dim objCurrencyManager As CurrencyManager #End Region
Chú ý: Khi khai báo kết nối cần phải đảm bảo đúng tên server, user id và password.
- Thủ tục đầu tiên ta sẽ tạo đó là thủ tục FillDataSetAndView. Thủ tục có thể coi là thủ tục khởi tạo các đối tượng.
Private Sub FillDataSetAndView()

Initialize a new instance of the DataSet object... objDataSet = New DataSet()

Fill the DataSet object with data... objDataAdapter.Fill(objDataSet, "Hoso")

Set the DataView object to the DataSet object... objDataView = New DataView(objDataSet.Tables("Hoso"))

Set our CurrencyManager object to the DataView object... objCurrencyManager = CType(Me.BindingContext(objDataView),

CurrencyManager)

End Sub- Thủ tục tiếp theo sẽ thực hiện kết nối các điều khiển trên form với đối tượng Dataview.
Private Sub BindFields()

Clear any previous bindings... txtMaSV.DataBindings.Clear() txtHodem.DataBindings.Clear() txtTenSV.DataBindings.Clear() txtNgaySinh.DataBindings.Clear() txtMaLop.DataBindings.Clear()

Add new bindings to the DataView object... txtMaSV.DataBindings.Add("Text", objDataView, "MaSV") txtHodem.DataBindings.Add("Text", objDataView, "HoDem") txtTenSV.DataBindings.Add("Text", objDataView, "TenSV") txtNgaySinh.DataBindings.Add("Text", objDataView, "Ngaysinh") txtMaLop.DataBindings.Add("Text", objDataView, "MaLop")

Display a ready status... ToolStripStatusLabel1.Text = "Ready"

End Sub- Thủ tục tiếp theo là sẽ hiển thị vị trí của bản ghi hiện thời trên form.
Private Sub ShowPosition()

Display the current position and the number of records txtRecordPosition.Text = objCurrencyManager.Position + 1 & _ " / " & objCurrencyManager.Count()

End Sub- Ta đã xây dựng các thủ tục. Ta sẽ gọi các thủ tục đó. Double-click Form Designer, chọn sự kiện Load form sau đó add đoạn code sau.
Private Sub frmNhapHSSV_Load(ByVal sender As System.Object, ByVal e As System.EventArgs) Handles MyBase.Load

Fill the DataSet and bind the fields...

Me.txtMaSV.Enabled = False FillDataSetAndView() BindFields()

Show the current record position... ShowPosition()

End Sub
Bây giờ ta sẽ chạy thử form: Debug\Start Debugging (F5)
- Tiếp theo ta sẽ viết code cho các navigation buttons. Để thực hiện duyệt các bản ghi trên form
Private Sub btnMoveFirst_Click(ByVal sender As Object, ByVal e As System.EventArgs) Handles btnMoveFirst.Click

Set the record position to the first record... objCurrencyManager.Position = 0

Show the current record position... ShowPosition()
End Sub

Private Sub btnMovePrevious_Click(ByVal sender As Object, ByVal e As System.EventArgs) Handles btnMovePrevious.Click
Move to the previous record... objCurrencyManager.Position -= 1
Show the current record position... ShowPosition()
End Sub
Private Sub btnMoveNext_Click(ByVal sender As Object, ByVal e As System.EventArgs) Handles btnMoveNext.Click

Move to the next record... objCurrencyManager.Position += 1

Show the current record position... ShowPosition()

End Sub

Private Sub btnLast_Click(ByVal sender As Object, ByVal e As System.EventArgs) Handles btnLast.Click
Set the record position to the last record... objCurrencyManager.Position = objCurrencyManager.Count - 1

Show the current record position... ShowPosition()
End Sub- Thêm các bản ghi.
Trước hết ta đưa đoạn code sau vào thủ tục của nút New.
Private Sub btnNew_Click(ByVal sender As Object, ByVal e As System.EventArgs) Handles btnNew.Click


txtMaSV.Text = "" txtHodem.Text = ""

txtTenSV.Text = "" txtNgaySinh.Text = "" txtMaLop.Text = ""


Me.txtMaSV.Enabled = True Me.cboMaLop.Visible = True Me.txtMaLop.Visible = False


Declare local variables and objects...

Dim objCommand As SqlCommand = New SqlCommand()

Dim objDataReader As SqlDataReader


Open the connection, execute the command objConnection.Open()

Set the SqlCommand object properties... objCommand.Connection = objConnection objCommand.CommandText = "Select MaLop, TenLop From Lop"

Execute the SqlCommand object to insert the new data... objDataReader = objCommand.ExecuteReader cboMaLop.Items.Clear()

Do While (objDataReader.Read()) cboMaLop.Items.Add(objDataReader.Item(0))

Loop

Close the connection... objConnection.Close()

End Sub
Đối với thủ tục này, ta sẽ cho các đối tượng Text box về rỗng để nhập dữ liệu. Riêng Text box txtMaLop sẽ được ẩn đi và thay vào đó là Combo box cboMaLop. Do mối quan hệ giữa hai quan hệ HOSOSV và LOP, cboMaLop sẽ chứa MaLop các lớp có trong danh mục Lop.
Trong phần này, ta có sử dụng đối tượng DataReader của lớp SqlDataReader. Khai báo đối tượng:
' Declare local variables and objects...

Dim objCommand As SqlCommand = New SqlCommand() Dim objDataReader As SqlDataReader
Thực hiện đối tượng Command và lưu kết quả để đọc vào đối tượng objDataReader. Và truy xuất dữ liệu đó.
Execute the SqlCommand object to insert the new data... objDataReader = objCommand.ExecuteReader cboMaLop.Items.Clear()

Do While (objDataReader.Read()) cboMaLop.Items.Add(objDataReader.Item(0))

Loop
Chèn dữ liệu vào CSDL. Đưa đoạn code sau vào sự kiện click của nút lệnh Add
Private Sub btnAdd_Click(ByVal sender As Object, ByVal e As System.EventArgs) Handles btnAdd.Click

Declare local variables and objects... Dim intPosition As Integer

Dim objCommand As SqlCommand = New SqlCommand()


Save the current record position... intPosition = objCurrencyManager.Position ' Open the connection, execute the command objConnection.Open()

Set the SqlCommand object properties... objCommand.Connection = objConnection objCommand.CommandText = "INSERT INTO HOSOSV " & _

"(MaSV, HoDem, TenSV, NgaySinh, MaLop) " & _ "VALUES(@MaSV,@Hodem,@TenSV,@NgaySinh,@MaLop)"

Add parameters for the placeholders in the SQL in the ' CommandText property...

objCommand.Parameters.AddWithValue("@MaSV", txtMaSV.Text) objCommand.Parameters.AddWithValue("@Hodem", txtHodem.Text) objCommand.Parameters.AddWithValue("@TenSV", txtTenSV.Text) objCommand.Parameters.AddWithValue("@NgaySinh",_

txtNgaySinh.Text).DbType = DbType.Date objCommand.Parameters.AddWithValue("@MaLop", cboMaLop.Text)


Execute the SqlCommand object to insert the new data... Try

objCommand.ExecuteNonQuery() Catch SqlExceptionErr As SqlException

MessageBox.Show(SqlExceptionErr.Message)

End Try


Close the connection... objConnection.Close()


Fill the dataset and bind the fields... FillDataSetAndView()

BindFields()

Set the record position to the one that you saved... objCurrencyManager.Position = intPosition

Show the current record position... ShowPosition()

Display a message that the record was added... ToolStripStatusLabel1.Text = "Record Added" Me.txtMaSV.Enabled = False

Me.cboMaLop.Visible = False Me.txtMaLop.Visible = True

End Sub- Thực hiện Update các bản ghi.
Private Sub btnUpdate_Click(ByVal sender As Object, ByVal e As System.EventArgs) Handles btnUpdate.Click

Declare local variables and objects... Dim intPosition As Integer

Dim objCommand As SqlCommand = New SqlCommand() ' Save the current record position...

intPosition = objCurrencyManager.Position


Set the SqlCommand object properties... objCommand.Connection = objConnection objCommand.CommandText = "UPDATE HOSOSV " & _

"SET HoDem = @HoDem, TenSV=@TenSV, NgaySinh=@NgaySinh, MaLop=@MaLop Where MaSV = @MaSV"

objCommand.CommandType = CommandType.Text

Add parameters for the placeholders in the SQL in the ' CommandText property...

objCommand.Parameters.AddWithValue("@Hodem", txtHodem.Text) objCommand.Parameters.AddWithValue("@TenSV", txtTenSV.Text) objCommand.Parameters.AddWithValue("@NgaySinh",

txtNgaySinh.Text).DbType = DbType.Date objCommand.Parameters.AddWithValue("@MaLop", txtMaLop.Text) objCommand.Parameters.AddWithValue_

("@MaSV", BindingContext(objDataView).Current("MaSV"))


Open the connection... objConnection.Open()

Execute the SqlCommand object to update the data... objCommand.ExecuteNonQuery()

Close the connection... objConnection.Close()

Fill the DataSet and bind the fields... FillDataSetAndView()

BindFields()

Set the record position to the one that you saved... objCurrencyManager.Position = intPosition

Show the current record position... ShowPosition()

Display a message that the record was updated... ToolStripStatusLabel1.Text = "Record Updated"

End Sub- Thực hiện Delete các bản ghi.
Private Sub btnDelete_Click(ByVal sender As Object, ByVal e As System.EventArgs) Handles btnDelete.Click

Declare local variables and objects... Dim intPosition As Integer

Dim objCommand As SqlCommand = New SqlCommand()


Save the current record position - 1 for the one to be ' deleted...

intPosition = Me.BindingContext(objDataView).Position - 1


If the position is less than 0 set it to 0...

If intPosition < 0 Then intPosition = 0

End If


Set the Command object properties... objCommand.Connection = objConnection objCommand.CommandText = "DELETE FROM HOSOSV " & _

"WHERE MaSV = @MaSV;"

Parameter for the MaSv field... objCommand.Parameters.AddWithValue _

("@MaSV",

BindingContext(objDataView).Current("MaSV"))


Open the database connection... objConnection.Open()

Execute the SqlCommand object to update the data... objCommand.ExecuteNonQuery()


Close the connection... objConnection.Close()


Fill the DataSet and bind the fields... FillDataSetAndView()

BindFields()


Set the record position to the one that you saved... Me.BindingContext(objDataView).Position = intPosition


Show the current record position... ShowPosition()


Display a message that the record was deleted... ToolStripStatusLabel1.Text = "Record Deleted"

End Sub- Viết code cho nút Close
Private Sub btnClose_Click(ByVal sender As Object, ByVal e As System.EventArgs) Handles btnClose.Click

Me.Close()

End Sub- Ta có thể biên dịch và chạy ứng dụng.
3. Xây dựng Form nhập DSLop

Ta thực hiện tương tự như Form trên. Nhưng nút Add ta sẽ minh họa cho việc sử dụng Stored Procedure.
- Trong SQL server ta xây dựng StoredProcedure như sau

- Viết code cho nút Add này như sau:
Private Sub btnAdd_Click(ByVal sender As Object, ByVal e As System.EventArgs) Handles btnAdd.Click


Declare local variables and objects... Dim intPosition As Integer

Dim objCommand As SqlCommand = New SqlCommand()


Save the current record position... intPosition = objCurrencyManager.Position


Open the connection, execute the command objConnection.Open()

Set the SqlCommand object properties... objCommand.Connection = objConnection objCommand.CommandText = "insert_Lop" objCommand.CommandType = CommandType.StoredProcedure


Add parameters for the placeholders in the SQL in the ' CommandText property...

objCommand.Parameters.AddWithValue("@MaLop", txtMaLop.Text) objCommand.Parameters.AddWithValue("@TenLop", txtTenLop.Text) objCommand.Parameters.AddWithValue("@Khoa", txtKhoa.Text)


' Execute the SqlCommand object to insert the new data...

Try

objCommand.ExecuteNonQuery()

Catch SqlExceptionErr As SqlException MessageBox.Show(SqlExceptionErr.Message)

End Try


Close the connection... objConnection.Close()


Fill the dataset and bind the fields... FillDataSetAndView()

BindFields()


Set the record position to the one that you saved... objCurrencyManager.Position = intPosition


Show the current record position... ShowPosition()


Display a message that the record was added... ToolStripStatusLabel1.Text = "Record Added"

End Sub
4. Xây dựng Form hiển thị danh sách sinh viên.
Mục đích của Form thực hiện hiển thị danh sách sinh viên theo từng lớp.
Ngoài ra ra cho phép thực hiện các thao tác:
- Cập nhật dữ liệu trên Grid.
- Sửa đổi dữ liệu trên Grid.
- Xóa dữ liệu trên Grid.
- Sắp xếp dữ liệu.
Xây dựng Form như hình trên gồm các control sau:

Import các tên miền cần thiết. Mở code editor và chèn đoạn code sau.
Import Data and SqlClient namespaces... Imports System.Data
Imports System.Data.SqlClient
Tiếp theo khai báo các đối tượng global trong phạm vi của form này.
#Region "Khai bao cac ket noi"

Dim objConnection As New SqlConnection _ ("server=THUHUONG;database=QLDiemSV;user

id=sa;password=12102006")

Dim objDataAdapter As New SqlDataAdapter() Dim objDataSet As DataSet

Dim objDataView As DataView #End Region
Chú ý: Khi khai báo kết nối cần phải đảm bảo đúng tên server, user id và password
Thủ tục đầu tiên ta sẽ tạo đó là thủ tục FillDataSetAndView. Thủ tục có thể coi là thủ tục khởi tạo các đối tượng.
Private Sub FillDataSetAndView()


Initialize a new instance of the DataSet object... objDataSet = New DataSet() objDataAdapter.SelectCommand = New SqlCommand() objDataAdapter.SelectCommand.Connection = objConnection objDataAdapter.SelectCommand.CommandText = _

"SELECT MaSV, HoDem, TenSV, NgaySinh, MaLop FROM HOSOSV WHERE

MaLop= '" & cboMaLop.SelectedItem(0) & "'"

objDataAdapter.SelectCommand.CommandType = CommandType.Text ' Open the database connection...

objConnection.Open()


Fill the DataSet object with data... objDataAdapter.Fill(objDataSet, "HosoSV")


Close the database connection... objConnection.Close()


Set the DataView object to the DataSet object... objDataView = New DataView(objDataSet.Tables("HosoSV"))

End Sub
Thủ tục tiếp theo là thủ tục thực hiện trang trí DataGridView
Private Sub Grid()

* trang tri Datagrid

Declare and set the currency header alignment property... Dim objAlignRightCellStyle As New DataGridViewCellStyle objAlignRightCellStyle.Alignment =

DataGridViewContentAlignment.MiddleRight


Declare and set the alternating rows style...

Dim objAlternatingCellStyle As New DataGridViewCellStyle() objAlternatingCellStyle.BackColor = Color.WhiteSmoke dgDanhSach.AlternatingRowsDefaultCellStyle = objAlternatingCellStyle


Change column names and styles using the column index dgDanhSach.Columns(0).HeaderText = "Mã sinh viên" dgDanhSach.Columns(1).HeaderText = "Họ đệm" dgDanhSach.Columns(2).HeaderText = "Tên" dgDanhSach.Columns(3).HeaderText = "Ngày sinh" dgDanhSach.Columns(4).HeaderText = "Mã lớp"


Clean up objAlternatingCellStyle = Nothing objAlignRightCellStyle = Nothing End Sub
Viết code cho thủ tục Load form.
Private Sub frmDanhSach_Load(ByVal sender As Object, ByVal e As System.EventArgs) Handles Me.Load


Dien dư lieu vào cboMaLop

Dim objDA_Lop As New SqlDataAdapter() Dim objDS_Lop As New DataSet()


objDA_Lop.SelectCommand = New SqlCommand()


objDA_Lop.SelectCommand.Connection = objConnection objDA_Lop.SelectCommand.CommandText = "SELECT MaLop, TenLop FROM Lop" objDA_Lop.SelectCommand.CommandType = CommandType.Text objConnection.Open()

Fill the DataSet object with data... objDA_Lop.Fill(objDS_Lop, "DMLop")

Close the database connection... objConnection.Close()


Me.cboMaLop.DataSource = objDS_Lop.Tables("DMLop") Me.cboMaLop.DisplayMember = "TenLop" Me.cboMaLop.ValueMember = "MaLop"


'Khởi tạo dữ liệu FillDataSetAndView()

Me.dgDanhSach.AutoGenerateColumns = True


Me.dgDanhSach.DataSource = objDataView Grid()

End Sub
5. Xây dựng báo cáo dùng Report.
A. Tạo file Report.rdlc
- Right - Click trên Project QL_DiemSV/Add/New Item/ chọn template Report. Xuất hiện cửa sổ thiết kế Report.
- Từ menu Data chọn Add New Data source để tạo nguồn dữ liệu mới sẽ thể hiện trên report hoặc chọn Show data sources nếu đã tồn tại trước đó. Ở đây ta chọn Add New Data source. Các cửa sổ Wizard sẽ chỉ dẫn ta thực hiện.


Chọn view Danh sach € Click nút Finish.
- Sau khi có nguồn dữ liệu, trong cửa sổ thiết kế Report ta sẽ thiết kế dữ liệu sẽ hiển thị trên Report. Như hình, gồm các đối tượng sau:


* Chèn group vào bảng.
- Trong cửa sổ thiết kế Right-click vào Table tại dòng ta muốn chèn Group và chọn Insert Group.

Trên tab General ta điền các tham số:
- Name: Tên của group
- Group on: Chọn biểu thức mà dựa vào đó dữ liệu gom nhóm.
- Document map label: Đánh hoặc chọn biểu thức được sử dụng làm nhãn ánh xạ.
- Parent group: Nếu group này là nhóm phân cấp ngược (phân cấp đệ quy) ta sẽ đánh hoặc chọn biểu thức làm nhóm cha (recursive group parent).
- Option chọn Page break at start hoặc Page break at end: để thay thế cho một page break tại một vị trí bắt đầu hoặc kết thúc một thể hiện của nhóm.
- Include group header hoặc Include group footer: Cho hiển thi hay không hiển thị Header và Footer của nhóm trên Table.
- Repeat group header hoặc Repeat group footer: để lặp lại group header hoặc footer trên mỗi trang mà trong đó bảng xuất hiện.
- Trên tab Fillters: Chọn hoặc đánh biểu thức dùng để lọc dữ liệu trên nhóm.
- Trên tab Sorting: Chọn hoặc đánh biểu thức dùng để sắp xếp dữ liệu trên nhóm.
- Trên tab Visibility: chọn Visible.
- Trên tab Data Output: Chọn Yes.
Trong ví dụ ta chèn hai Group: table1_GroupTenLop và table1_Group2

B. Hiển thị dữ liệu.

Để kết Report vào form, ta xây dựng form hiển thị. Đặt một điều khiển Report Viewer. Trên Report Viewer Tasks chọn các mục sau:
- Choose report: Chọn report ta vừa thiết kế (report.rdlc)
- Dock in parent container. Chọn.
C. Sử dụng tham số trong Report.
a) Tạo tham số
Trong cửa sổ thiết kế Report, để thiết lập tham số ta thực hiện như sau: Từ menu Report\Report Paramaters để Add các tham số cho Report

Chọn nút Add để tạo thêm một tham số mới gồm các thông tin:
- Name: Tên tham số
- Data type: Kiểu dữ liệu của tham số
- Prompt: Điền đoạn text sẽ xuất hiện sau parameter text box khi người sử dụng thực hiện chạy report.
- Allow null value: Chọn khi cho phép tham số nhận giá trị null.
- Allow blank value: Chọn khi cho phép thma số nhận giá trị blank.
- Available values: Đưa ra một danh sách các giá trị sẵn có mà người sử dụng có thể lựa chọn.Lable: Chứa nhãn sẽ được sử dụng để hiển thị cho người sử dụng.Value: Là giá trị sẽ được sử dụng để chuyển qua Report sever cho tham số.
- Default values: Giá trị mặc định cho tham số.
Chọn nút Remove để xóa tham số đã chọn.
Sau khi đã tạo tham số, ta có thể sử dụng tham số trong khi thiết kế Report. Trong ví dụ ta này ta xây dựng một report như trên, ngoài ra add thêm tham số prmTenLop và lọc dữ liệu theo tham số.

b) Truyền giá trị cho tham số:
Để truyền giá trị cho tham số ta sử dụng phương thức SetParameters của lớp Report trong tên miền Microsoft.Reporting.WinForms. Cụ thể ta sử dụng như sau:
‘ Gán giá trị cho tham số

Dim p As New ReportParameter("prmTenLop", Me.cboMaLop.SelectedItem(1).ToString)

‘ Truyền giá trị vào report Me.rvwDSReport.LocalReport.SetParameters(New ReportParameter() {p})
Giả sử ta có form hiển thị Report như sau:

Có các đối tượng sau:

- Import các tên miền cần thiết.
Import Data and SqlClient namespaces... Imports System.Data
Imports System.Data.SqlClient Imports Microsoft.Reporting.WinForms- Khai báo các kết nối
Dim objConnection As New SqlConnection _ ("server=THUHUONG;database=QLDiemSV;user
id=sa;password=12102006")- Code so sự kiện load form.
Private Sub frmReportCode_Load(ByVal sender As System.Object, ByVal e As System.EventArgs) Handles MyBase.Load


Dien dư lieu vào cboLop

Dim objDA_Lop As New SqlDataAdapter() Dim objDS_Lop As New DataSet()

objDA_Lop.SelectCommand = New SqlCommand() objDA_Lop.SelectCommand.Connection = objConnection objDA_Lop.SelectCommand.CommandText = "SELECT MaLop, TenLop FROM Lop" objDA_Lop.SelectCommand.CommandType = CommandType.Text objConnection.Open()

Fill the DataSet object with data... objDA_Lop.Fill(objDS_Lop, "DMLop")

Close the database connection... objConnection.Close()


Me.cboMaLop.DataSource = objDS_Lop.Tables("DMLop") Me.cboMaLop.DisplayMember = "TenLop" Me.cboMaLop.ValueMember = "MaLop"


Set tham so cho Report

Dim p As New ReportParameter("prmTenLop", Me.cboMaLop.SelectedItem(1).ToString) Me.rvwDSReport.LocalReport.SetParameters(New ReportParameter() {p})

'This line of code loads data into the 'QLDiemSVDataSet.DanhSach' Me.objTableAdapterDSSV.Fill(Me.objDataSetDSSV.DanhSach)

Me.rvwDSReport.RefreshReport() End Sub- Đồng bộ hóa dữ liệu trên form.
Private Sub cboMaLop_SelectedIndexChanged(ByVal sender As Object, ByVal e As System.EventArgs) Handles cboMaLop.SelectedIndexChanged

Dim p As New ReportParameter("prmTenLop", Me.cboMaLop.SelectedItem(1).ToString) Me.rvwDSReport.LocalReport.SetParameters(New ReportParameter() {p}) Me.rvwDSReport.RefreshReport()

End Sub
6. Xây dựng report dùng Crystal Report.
Trong phần này hướng dẫn xây dựng Report bằng Crystal report một cách đơn giản nhất, sử dụng Wizard. Trong khi thiết kế ta nên dùng wizard để thiết kế sơ bộ, sau đó chuyển vào cửa sổ thiết kế để thiết kế chi tiết.
Các bước thiết kế report.
- Right – Click trên Project QL_DiemSV/Add/New Item/ chọn template Crystal Report. Điền tên file của Crystal Report. Xuất hiện cửa sổ sau:Cửa sổ 1.

- Chọn Using the Repor Wizart và Standard € OK.

Chọn OLE DB (ADO) € Xuất hiện cửa sổ 3.

Chọn Microsoft OLE DB Provider for SQL Server. € Next.

Chọn server, User, password và Database. €Finish. Để quay lại cửa sổ 2. Chọn dữ liệu sẽ được hiển thị trên report.
Cửa sổ 2: Chọn nguồn dữ liệu cho Report.


Sau khi đã xây dựng được file *.rpt. Ta xây dựng form để hiển thị report trên. Thiết kế form như hình gồm một đối tượng Crystal Report Viewer. Trên Crystal Report Viewer tasks thực hiện các mục:
- Choose a crystal report: Chọn Report vừa tạo trên.
- Dock in parent container: Chọn.

Được cập nhật: 14 tháng 4 lúc 9:59:30 | Lượt xem: 682